Overview
High-dye strapping for feet
Strapping (also known as taping) has a number of uses. Muscles, tendons, and ligaments can be injured by overstretching. Strapping stops more overstretching by restricting movement and causing muscles to work differently.
There are many different uses of strapping. Each is specific to certain treatments. Your podiatrist will advise you about which type of strapping is suitable for you.
Risks of high-dye strapping
The main risk related to strapping is an allergic reaction to the zinc oxide tape. If you know you are allergic to certain sticking plaster, please tell your podiatrist before they attempt to use it.
If you come out in a rash or if your skin becomes itchy, remove the plaster immediately.
This treatment may not be suitable if you have:
- fragile skin
- poor blood supply
- rashes
- skin ulcers
- swollen legs
What you will need
You will need a roll of 2.5cm-wide non-stretch tape. Brand names include Leukoplast® and Strappal®. These are available online, from sports shops, and at pharmacies.
When reapplying your strapping at home, try to follow the instructions as closely as possible.
When to apply strapping
The strapping will have an effect for up to 3 days. When you want to change it, take it off at night and reapply it in the morning, to give the skin a chance to recover.
How to apply strapping
It is easier to stop the tape twisting over if you keep it on its tube and unroll it as you go along, rather than cutting off a strip.
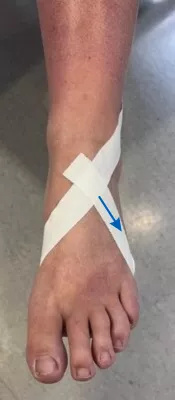
Step 1
Your foot needs to be at a 90 degree angle to your leg (not pointed up or down), and not twisted in or out.
Step 2
Start on the top of the middle of the outside edge of the foot. Then roll the tape under the arch, from the outside to the inside of the foot.
Bring the tape up onto the top of the ankle and diagonally across the front of the ankle, and continue across to the outside edge of the lower leg. Cut the tape when you have completed this step.
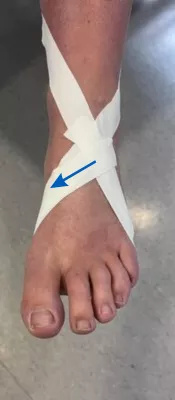
Step 3
Start on the top of the arch on the inside edge of the foot. Then roll the tape under the arch across the middle of the foot from the inside to the outside edge of the foot.
Take the strap onto the top of the foot and diagonally across the front of the ankle, and to the inside edge of the lower leg.
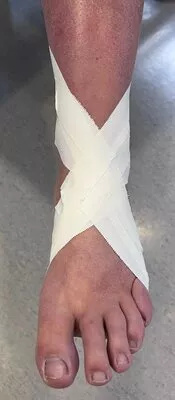
Step 4
Repeat both straps 3 times, overlapping the edges by half the width of the tape each time. You can use an elasticated bandage stocking to protect the strapping. These are available from most pharmacies.
Removing the strapping
When removing the tape, pull it off slowly. If it is difficult to remove, soak your foot in water for 10 minutes. The strapping will become ineffective and unhygienic if it becomes wet (for example, when showering). You can use a waterproof cover, such as LimbO® or Sealtight®. These are available from pharmacies or online.
Follow-up appointment
Often the podiatrist will book a follow-up appointment. At this appointment, the podiatrist will discuss how effective the strapping and any other treatments have been. They may also make a longer-term treatment plan.
More information and support
Versus Arthritis is a UK charity providing information and support for people living with arthritis. You can read their information about foot and ankle pain.
The Royal College of Podiatry have information for patients about different types of foot conditions.
Resource number: 4788/VER3
Last reviewed: May 2024
Next review due: May 2027